
Introduction: Turning Old Phones into Smart Home Controllers (2026)
In 2026, smart homes are becoming common, but controlling them still mostly depends on mobile apps or voice assistants. While these options are convenient, they are not always the fastest or most reliable. Sometimes you just want a simple physical button to trigger an action instantly.
That’s where the Feature Phone IoT Controller idea becomes interesting. Instead of throwing away an old keypad phone, you can convert it into a dedicated smart home remote using a small microcontroller like ESP32. The tactile keypad of feature phones makes them perfect for quick commands such as turning off lights, activating security, or running automation routines.
In this guide, you’ll learn how to transform an old feature phone into a Feature Phone IoT Controller in a simple DIY setup. By combining classic hardware with modern IoT technology, you can give your old gadget a new life while building a practical controller for your smart home.
2. Why Build a Feature Phone IoT Controller?
This is one of the most practical and unique projects in the DIY Old Gadgets Upgrade 2026 guide, offering benefits modern smartphones can’t match.
Reliable, Tactile Control
Modern smart home control is usually done via touchscreen or voice assistant. The Feature Phone IoT Controller gives you physical, satisfying buttons. You can set the phone down by the door, and with one or two key presses, execute complex routines without unlocking a screen or shouting a command.
Low Power and Dedication
Your Feature Phone IoT Controller will run on a small, efficient ESP32 module, meaning it draws minimal power and can run for extended periods on a small battery. Because it does one job, it does it perfectly. You won’t accidentally minimize the app or get distracted by notifications.
Security and 2FA Potential
The robust, offline nature of this device makes it ideal for secure applications. You can program complex key codes to serve as a physical two-factor authentication (2FA) token, ensuring specific routines (like unlocking a secure door) can only be triggered when you physically enter the code on the Feature Phone IoT Controller. It’s especially handy near entry doors, garages, or workstations — places where physical control is faster than opening an app.
3. Hardware and Parts Checklist: Keypad Mapping
| Component | Why You Need It |
|---|---|
| ESP32 Dev Board | Handles Wi-Fi and keypad signals |
| Feature Phone Shell | Provides physical keypad |
| Jumper Wires & Perfboard | Connect keypad to ESP32 |
| LiPo Battery & Charger | Portable power source |
| Soldering Tools | Required for keypad wiring |
4. Step-by-Step Tutorial: Physical Setup (Keypad Matrix Mapping)
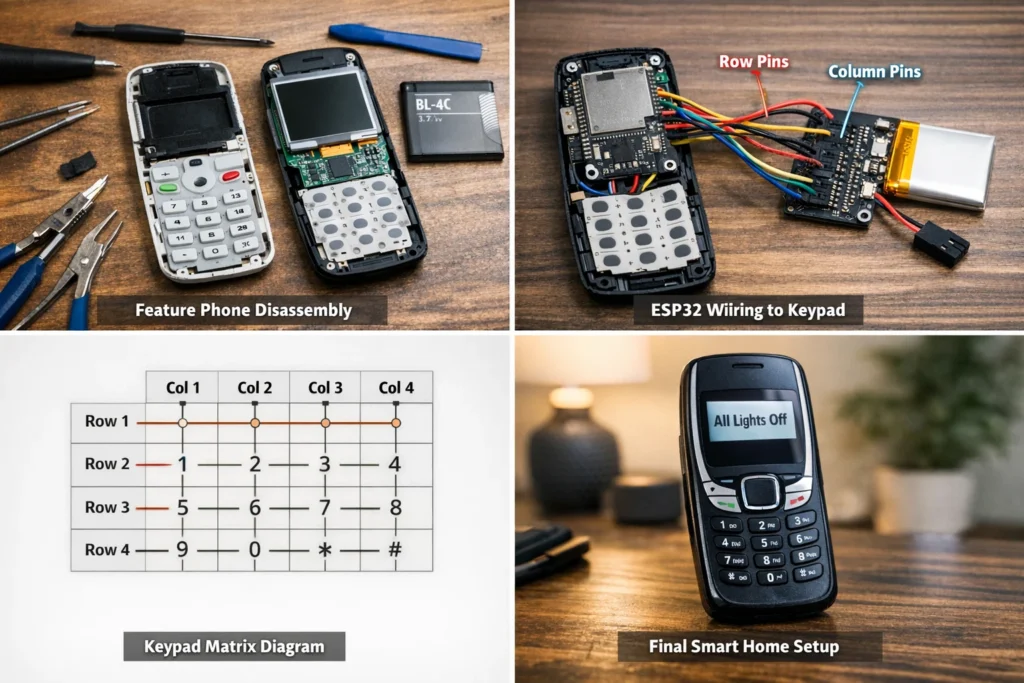
Step 1: Safe Disassembly and Keypad Isolation
- Open the Phone: Carefully open the feature phone shell. Locate the keypad circuit board or membrane.
- Identify Pins: On the keypad connector ribbon, identify the Row Pins and Column Pins. A standard 4×4 keypad typically has 8 pins (4 rows + 4 columns). You may need to use a multimeter to map which pin corresponds to which row/column line.
- Isolate: Carefully remove the original phone’s motherboard, leaving only the keypad and shell intact.
Step 2: Keypad Matrix Wiring to ESP32
- Solder Leads: Carefully solder thin-gauge wires to the Row and Column pins you identified on the keypad connector.
- Connect to ESP32: Connect these wires to specific GPIO pins on the ESP32. Example: Rows → GPIO 18, 19, 21, 22; Columns → GPIO 23, 25, 26, 27.
- Mount: Mount the small ESP32 board and the LiPo battery neatly inside the phone shell using hot glue or 3D-printed brackets.
5. Step-by-Step Tutorial: Software Configuration (Code and Triggers)
Step 3: ESP32 Keypad Library Setup
- Install Arduino IDE and the ESP32 board package.
- Add the Keypad.h library to read key presses.
- Define your keypad matrix layout and assign GPIO pins in the code.
💡 Learn more about ESP32 and IoT Projects on Arduino Official Site.
Short Code Example
This simplified Arduino example reads keypad input and triggers commands based on button presses.
#include <Keypad.h>

char key = keypad.getKey();

if (key) {
  Serial.println(key);

  if (key == '1') {
    sendCommand("lights_on");
  }

  if (key == '2') {
    sendCommand("lights_off");
  }
}
Step 4: Translating Keypress to Webhooks/MQTT
This is the core functionality of your Feature Phone IoT Controller.
- Create if/else conditions for key sequences (e.g.,
#99triggers the “All Off” routine). - Use ESP32 to send HTTP POST (Webhook) or MQTT messages to your smart home system.
- Add LED feedback for confirmation.
Step 5: Integrating with Your Smart Home
Set up automation in your smart home hub (like Home Assistant) to listen for MQTT or Webhook commands from your Feature Phone IoT Controller.
🔗 Get started with Home Assistant Automation.
Safety Tips
- Use proper LiPo charger module
- Avoid overcharging battery
- Insulate wires properly
- Ensure ventilation inside phone shell
6. DIY Old Gadgets Upgrade 2026: Project Comparison
Visually Comparing Two Awesome Projects: The Smart Display vs. the IoT Controller. Which will you build first?
- Total Steps: 4–6 per project
- Estimated Cost: $20–$50
- Time Required: 1–4 hours
Smart Display Project
Convert any old monitor into a dynamic, always-on dashboard. Perfect for beginners — no soldering required.
IoT Controller Project
Turn a classic feature phone into a tactile remote for your smart home. This Feature Phone IoT Controller project is ideal for makers comfortable with basic wiring.
7. Pros and Cons of Feature Phone IoT Controller
Pros
- Physical button control for smart home actions
- Very low power consumption
- Reuses old feature phones (reduces e-waste)
- Dedicated device without distractions
- Custom keypad commands possible
Cons
- Requires basic soldering and wiring
- Initial setup takes some time
- Limited interface compared to smartphone apps
- Needs a smart home hub like Home Assistant
8. Conclusion and Your Next Upgrade
You have successfully converted a relic of the past into a Feature Phone IoT Controller, proving that upcycling old gadgets is practical and fun. This device is now your one-touch remote for your smart home, combining old-school reliability with modern IoT power.
🪞 Explore the MagicMirror² Smart Display Setup Guide to create a live dashboard for your IoT data.
👉 Return to the Main Guide: DIY Old Gadgets Upgrade 2026
🔗 Explore the Full Series
This project is part of the DIY Old Gadgets Upgrade 2026 series — where we transform vintage tech into powerful modern tools. Read the full guide here →
🧩 FAQs about Feature Phone IoT Controller

Q1. What is a Feature Phone IoT Controller?
Ans. It’s a DIY project that turns an old mobile phone into a physical smart home remote using an ESP32 microcontroller.
Q2. Do I need coding knowledge?
Ans. No, the Feature Phone IoT Controller project is beginner-friendly and works with Arduino IDE and Keypad.h library.
Q3. Which hardware is required?
Ans. ESP32 Dev Board, jumper wires, LiPo battery, feature phone shell, and soldering tools.
Q4. Can it work offline?
Ans. Yes, it can send MQTT signals over your home Wi-Fi without internet.
Q5. How much does it cost?
Ans. Around $25–$40 depending on components used.
Q6. Is it safe for 24/7 use?
Ans. Yes, the ESP32 draws minimal power. Ensure ventilation and battery safety for continuous operation.